准备工作-安装命令
首先记录centos下的两个命令:rpm和yum
rpm
centos下查看rpm命令的文档如下:
man rpm > rpm.man
文件rpm.man的摘要:
RPM(8)                      System Manager's Manual                     RPM(8)

NAME
       rpm - RPM Package Manager

SYNOPSIS
   QUERYING AND VERIFYING PACKAGES:
       rpm {-q|--query} [select-options] [query-options]

       rpm {-V|--verify} [select-options] [verify-options]

   INSTALLING, UPGRADING, AND REMOVING PACKAGES:
       rpm {-i|--install} [install-options] PACKAGE_FILE ...

       rpm {-U|--upgrade} [install-options] PACKAGE_FILE ...

       rpm {-F|--freshen} [install-options] PACKAGE_FILE ...

       rpm {-e|--erase} [--allmatches] [--nodeps] [--noscripts]
           [--notriggers] [--test] PACKAGE_NAME ...

   MISCELLANEOUS:
       rpm {--querytags|--showrc}

       rpm {--setperms|--setugids} PACKAGE_NAME ...

   select-options
        [PACKAGE_NAME] [-a,--all] [-f,--file FILE]
        [-g,--group GROUP] {-p,--package PACKAGE_FILE]
        [--hdrid SHA1] [--pkgid MD5] [--tid TID]
        [--querybynumber HDRNUM] [--triggeredby PACKAGE_NAME]
        [--whatprovides CAPABILITY] [--whatrequires CAPABILITY]

   query-options
        [--changelog] [-c,--configfiles] [--conflicts]
        [-d,--docfiles] [--dump] [--filesbypkg] [-i,--info]
        [--last] [-l,--list] [--obsoletes] [--provides]
        [--qf,--queryformat QUERYFMT] [-R,--requires]
        [--scripts] [-s,--state] [--triggers,--triggerscripts]

   verify-options
        [--nodeps] [--nofiles] [--noscripts]
        [--nodigest] [--nosignature]
        [--nolinkto] [--nofiledigest] [--nosize] [--nouser]
        [--nogroup] [--nomtime] [--nomode] [--nordev]
        [--nocaps]

   install-options
        [--allfiles] [--badreloc] [--excludepath OLDPATH]
        [--excludedocs] [--force] [-h,--hash]
        [--ignoresize] [--ignorearch] [--ignoreos]
        [--includedocs] [--justdb] [--nocollections]
        [--nodeps] [--nodigest] [--nosignature]
        [--noorder] [--noscripts] [--notriggers]
        [--oldpackage] [--percent] [--prefix NEWPATH]
        [--relocate OLDPATH=NEWPATH]
        [--replacefiles] [--replacepkgs]
        [--test]

DESCRIPTION
       rpm is a powerful Package Manager, which can be used to build, install,
       query, verify, update, and erase individual software packages.  A pack‐
       age  consists  of an archive of files and meta-data used to install and
       erase the archive files. The meta-data includes  helper  scripts,  file
       attributes,  and  descriptive  information about the package.  Packages
       come in two varieties: binary packages, used to encapsulate software to
       be  installed,  and  source  packages,  containing  the source code and
       recipe necessary to produce binary packages.

       One of the following basic  modes  must  be  selected:  Query,  Verify,
       Install/Upgrade/Freshen,  Uninstall, Set Owners/Groups, Show Querytags,
       and Show Configuration.

   GENERAL OPTIONS
       These options can be used in all the different modes.

       -?, --help
              Print a longer usage message then normal.

       --version
              Print a single line containing the version number of  rpm  being
              used.

       --quiet
              Print  as little as possible - normally only error messages will
              be displayed.

       -v     Print verbose information - normally routine  progress  messages
              will be displayed.

       -vv    Print lots of ugly debugging information.

       --rcfile FILELIST
              Each  of  the  files  in  the  colon  separated FILELIST is read
              sequentially by rpm for  configuration  information.   Only  the
              first  file  in the list must exist, and tildes will be expanded
              to   the   value   of   $HOME.    The   default   FILELIST    is
              /usr/lib/rpm/rpmrc:/usr/lib/rpm/red‐
              hat/rpmrc:/etc/rpmrc:~/.rpmrc.

       --pipe CMD
              Pipes the output of rpm to the command CMD.

       --dbpath DIRECTORY
              Use the database in  DIRECTORY  rather  than  the  default  path
              /var/lib/rpm

       --root DIRECTORY
              Use the file system tree rooted at DIRECTORY for all operations.
              Note that this means the database within DIRECTORY will be  used
              for  dependency  checks  and  any  scriptlet(s)  (e.g.  %post if
              installing, or %prep if building, a package) will be run after a
              chroot(2) to DIRECTORY.

       -D, --define='MACRO EXPR'
              Defines MACRO with value EXPR.

       --undefine='MACRO'
              Undefines MACRO.

       -E, --eval='EXPR'
              Prints macro expansion of EXPR.

... ... 省略
中文的参考资料:
yum
centos下查看yum命令的文档如下:
man yum > yum.man
文件yum.man的摘要:
yum(8)                                                                  yum(8)

NAME
       yum - Yellowdog Updater Modified

SYNOPSIS
       yum [options] [command] [package ...]

DESCRIPTION
       yum is an interactive, rpm based, package manager. It can automatically
       perform system updates, including dependency analysis and obsolete pro‐
       cessing  based  on "repository" metadata. It can also perform installa‐
       tion of new packages, removal of old packages and  perform  queries  on
       the  installed and/or available packages among many other commands/ser‐
       vices (see below). yum is similar to other high level package  managers
       like apt-get and smart.

       While  there  are  some  graphical interfaces directly to the yum code,
       more recent graphical interface development  is  happening  with  Pack‐
       ageKit and the gnome-packagekit application.

       command is one of:
        * install package1 [package2] [...]
        * update [package1] [package2] [...]
        * update-to [package1] [package2] [...]
        * update-minimal [package1] [package2] [...]
        * check-update
        * upgrade [package1] [package2] [...]
        * upgrade-to [package1] [package2] [...]
        * distribution-synchronization [package1] [package2] [...]
        * remove | erase package1 [package2] [...]
        * autoremove [package1] [...]
        * list [...]
        * info [...]
        * provides | whatprovides feature1 [feature2] [...]
        * clean [ packages | metadata | expire-cache | rpmdb | plugins | all ]
        * makecache [fast]
        * groups [...]
        * search string1 [string2] [...]
        * shell [filename]
        * resolvedep dep1 [dep2] [...]
           (maintained  for  legacy  reasons  only - use repoquery or yum pro‐
       vides)
        * localinstall rpmfile1 [rpmfile2] [...]
           (maintained for legacy reasons only - use install)
        * localupdate rpmfile1 [rpmfile2] [...]
           (maintained for legacy reasons only - use update)
        * reinstall package1 [package2] [...]
        * downgrade package1 [package2] [...]
        * deplist package1 [package2] [...]
        * repolist [all|enabled|disabled]
        * repoinfo [all|enabled|disabled]
        * repository-packages <enabled-repoid> <install|remove|remove-or-rein‐
       stall|remove-or-distribution-synchronization> [package2] [...]
         * version [ all | installed | available | group-* | nogroups* | grou‐
       plist | groupinfo ]
          *   history    [info|list|packages-list|packages-info|summary|addon-
       info|redo|undo|rollback|new|sync|stats]
        * load-transaction [txfile]
        * updateinfo [summary | list | info | remove-pkgs-ts | exclude-updates
       | exclude-all | check-running-kernel]
        * fssnapshot [summary | list | have-space | create | delete]
        * fs [filters | refilter | refilter-cleanup | du]
        * check
        * help [command]

       Unless the --help or -h option is given, one of the above commands must
       be present.

       Repository configuration is honored in all operations.
从上面的介绍中可以看到,yum是更高一个级别的包管理工具(high level package manager)。
yum是基于rpm的,同时解决了rpm中包之间依赖关系的问题。
也就是说,当我们安装一个软件的时候,在使用rpm安装时可能需要提前自己手动安装其依赖的其他文件。
而使用yum则会自动帮我们下载、安装所有的依赖软件及其自身。
Apache 安装及配置
首先查看系统中是否已经安装过Apache,使用命令:
rpm -qa | grep httpd
如果没有输出显示,则表示未安装
[shebnowei@localhost ~]$ rpm -qa | grep httpd
[shebnowei@localhost ~]$
安装 Apache install
sudo yum install httpd
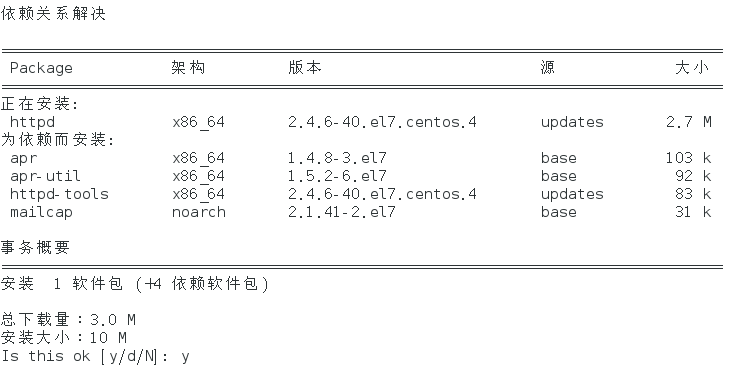
之后首先会先通过yum源解决需要安装软件的依赖关系:

输入y后回车,会下载相关依赖包进行安装,在安装过程中,可能会提示公钥尚未安装,需要继续输入y进行导入确认:

安装完成后,会显示安装的软件以及依赖包的具体名称和版本:
已安装:
  httpd.x86_64 0:2.4.6-40.el7.centos.4

作为依赖被安装:
  apr.x86_64 0:1.4.8-3.el7                      apr-util.x86_64 0:1.5.2-6.el7
  httpd-tools.x86_64 0:2.4.6-40.el7.centos.4    mailcap.noarch 0:2.1.41-2.el7

完毕!
安装后查看httpd相关的软件包以及概要信息如下:
[shebnowei@localhost ~]$ rpm -qa | grep httpd
httpd-2.4.6-40.el7.centos.4.x86_64
httpd-tools-2.4.6-40.el7.centos.4.x86_64
[shebnowei@localhost ~]$ rpm -qi httpd
Name        : httpd
Version     : 2.4.6
Release     : 40.el7.centos.4
Architecture: x86_64
Install Date: 2016年11月01日 星期二 16时38分05秒
Group       : System Environment/Daemons
Size        : 9806117
License     : ASL 2.0
Signature   : RSA/SHA256, 2016年07月19日 星期二 00时05分16秒, Key ID 24c6a8a7f4a80eb5
Source RPM  : httpd-2.4.6-40.el7.centos.4.src.rpm
Build Date  : 2016年07月18日 星期一 23时32分11秒
Build Host  : worker1.bsys.centos.org
Relocations : (not relocatable)
Packager    : CentOS BuildSystem <http://bugs.centos.org>
Vendor      : CentOS
URL         : http://httpd.apache.org/
Summary     : Apache HTTP Server
Description :
The Apache HTTP Server is a powerful, efficient, and extensible
web server.
配置 Apache config
Apache的配置文件为:/etc/httpd/conf/httpd.conf
去掉注释后,初始的配置文件如下(附上简单中文解释):
#apache软件安装的位置。其它指定的目录如果没有指定绝对路径,则目录是相对于该目录。结尾不要/。
ServerRoot "/etc/httpd"

#服务器监听的端口号。
Listen 80

#包含其他的配置文件。
Include conf.modules.d/*.conf

#指定运行apache的用户名和组。
User apache
Group apache

#管理员的邮件地址。
ServerAdmin root@localhost

#站点所在的路径,即http://my.example.com/index.htm将会指向/var/www/html/index.html文件。
DocumentRoot "/var/www/html"

#<Directory> 和 </Directory> 用来包含一组指令,这组指令只应用于该<Directory>中指定的文件目录。
#AllowOverride表示服务器是否去搜索、使用.htacess文件中的指令。
#Require为该目录的访问控制指令。
#Options为控制该目录所能使用的服务器功能。
<Directory />
    AllowOverride none
    Require all denied
</Directory>

<Directory "/var/www">
    AllowOverride None
    Require all granted
</Directory>

<Directory "/var/www/html">
    Options Indexes FollowSymLinks
    AllowOverride None
    Require all granted
</Directory>

#根据指定的模块是否存在为条件而决定是否进行处理。
<IfModule dir_module>
    DirectoryIndex index.html
</IfModule>

#包含一组指令,该指令只作用于指定文件。类似<Directory> 和 </Directory>
<Files ".ht*">
    Require all denied
</Files>

#设定错误日志文件。
ErrorLog "logs/error_log"

#日志级别控制
LogLevel warn

<IfModule log_config_module>
    LogFormat "%h %l %u %t \"%r\" %>s %b \"%{Referer}i\" \"%{User-Agent}i\"" combined
    LogFormat "%h %l %u %t \"%r\" %>s %b" common
    <IfModule logio_module>
      LogFormat "%h %l %u %t \"%r\" %>s %b \"%{Referer}i\" \"%{User-Agent}i\" %I %O" combinedio
    </IfModule>
    CustomLog "logs/access_log" combined
</IfModule>

<IfModule alias_module>
    ScriptAlias /cgi-bin/ "/var/www/cgi-bin/"
</IfModule>

<Directory "/var/www/cgi-bin">
    AllowOverride None
    Options None
    Require all granted
</Directory>

<IfModule mime_module>
    TypesConfig /etc/mime.types
    AddType application/x-compress .Z
    AddType application/x-gzip .gz .tgz
    AddType text/html .shtml
    AddOutputFilter INCLUDES .shtml
</IfModule>

AddDefaultCharset UTF-8

<IfModule mime_magic_module>
    MIMEMagicFile conf/magic
</IfModule>

#控制httpd是否可以使用操作系统内核的sendfile支持来将文件发送到客户端。
EnableSendfile on

#包含其他的配置文件。
IncludeOptional conf.d/*.conf
附上官方文档,方便查询: Apache HTTP 服务器版本 2.4
启动 Apache control
启动Apache
systemctl start httpd.service
停止Apache
systemctl stop httpd.service
重启Apache
systemctl restart httpd.service
查看Apache状态
systemctl status httpd.service
设置Apache开机启动
systemctl enable httpd.service
取消Apache开机启动
systemctl disable httpd.service
Nginx 安装及配置
Nginx(“engine x”) 是一个高性能的HTTP和反向代理服务器,也是一个IMAP/POP3/SMTP服务器。Nginx是由Igor Sysoev为俄罗斯访问量第二的Rambler.ru站点开发的,第一个公开版本0.1.0发布于2004年10月4日。 其将源代码以类BSD许可证的形式发布,因它的稳定性、丰富的功能集、示例配置文件和低系统资源的消耗而闻名。
计划之后继续比较Nginx和Apache,写一篇比较文档。这里暂时只记录安装和配置。
安装 Nginx install
如果像安装httpd一样,直接使用yum安装
sudo yum install nginx
会出现如下为问题:
已加载插件:fastestmirror, langpacks
base                                                     | 3.6 kB     00:00
extras                                                   | 3.4 kB     00:00
updates                                                  | 3.4 kB     00:00
Loading mirror speeds from cached hostfile
 * base: mirrors.btte.net
 * extras: mirrors.tuna.tsinghua.edu.cn
 * updates: mirrors.tuna.tsinghua.edu.cn
没有可用软件包 nginx。
错误:无须任何处理
这是因为yum默认源中并没有添加nginx的软件包,需要我们自己手动添加:
sudo rpm -Uvh http://nginx.org/packages/centos/7/noarch/RPMS/nginx-release-centos-7-0.el7.ngx.noarch.rpm
成功添加输出为(ps 应该还有其他的添加方式,这种应该比较方便简单):
获取http://nginx.org/packages/centos/7/noarch/RPMS/nginx-release-centos-7-0.el7.ngx.noarch.rpm
警告:/var/tmp/rpm-tmp.doxT0g: 头V4 RSA/SHA1 Signature, 密钥 ID 7bd9bf62: NOKEY
准备中...                          ################################# [100%]
正在升级/安装...
   1:nginx-release-centos-7-0.el7.ngx ################################# [100%]
之后再执行命令:
sudo yum install nginx
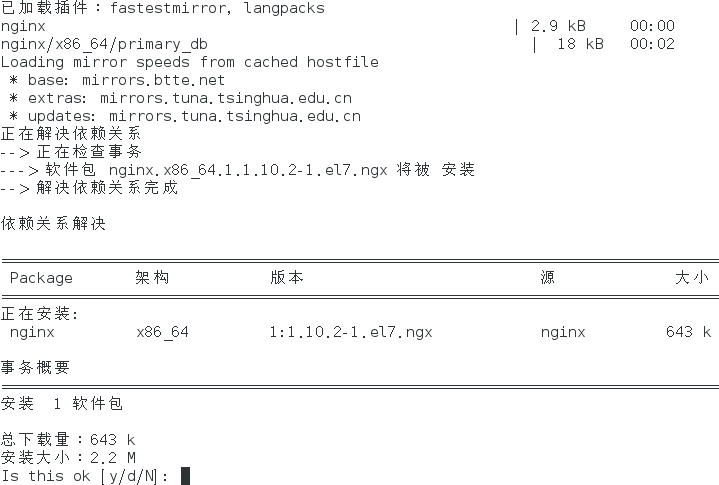
之后,通过手动添加的源,则会自动解决依赖关系:

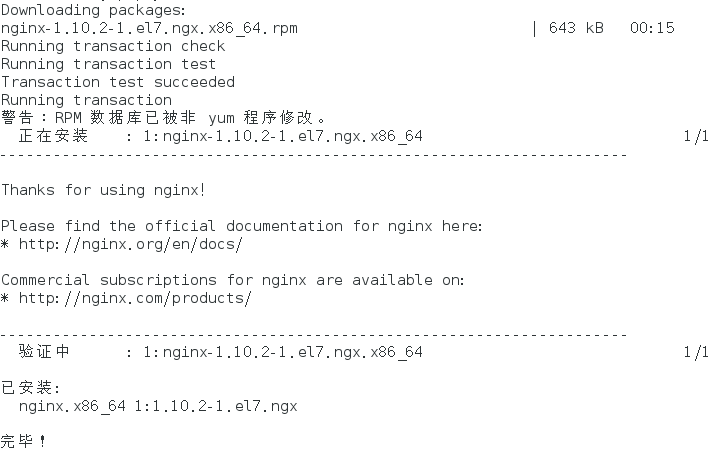
输入y进行下载安装。安装完成如下图所示:

通过rpm命令查看安装的软件信息:
[shebnowei@bogon ~]$ rpm -qi nginx
Name        : nginx
Epoch       : 1
Version     : 1.10.2
Release     : 1.el7.ngx
Architecture: x86_64
Install Date: 2016年11月05日 星期六 17时42分44秒
Group       : System Environment/Daemons
Size        : 2255765
License     : 2-clause BSD-like license
Signature   : RSA/SHA1, 2016年10月19日 星期三 01时26分36秒, Key ID abf5bd827bd9bf62
Source RPM  : nginx-1.10.2-1.el7.ngx.src.rpm
Build Date  : 2016年10月19日 星期三 00时37分31秒
Build Host  : centos7-amd64-builder-builder.gnt.nginx.com
Relocations : (not relocatable)
Vendor      : Nginx, Inc.
URL         : http://nginx.org/
Summary     : High performance web server
Description :
nginx [engine x] is an HTTP and reverse proxy server, as well as
a mail proxy server.
配置 Nginx config
Nginx的配置文件在/etc/nginx目录中,其中分为:
-
全局配置文件:/etc/nginx/nginx.conf
-
默认站点配置文件:/etc/nginx/conf.d/default.conf
-
自定义站点配置文件:/etc/nginx/conf.d/*.conf
下面分为两部分,分别学习nginx服务器的全局配置和站点配置。
全局配置
默认的Nginx全局配置文件及注释:
[shebnowei@bogon nginx]$ cat nginx.conf

# 运行的用户和用户组:用户 组。
user  nginx;

# 进程数,即处理请求的进程。初始可设置为CPU总核数。
worker_processes  1;

# 错误日志:存放路径 及日志控制级别(记录warn及以上级别的日志)。
error_log  /var/log/nginx/error.log warn;

# 把进程号记录到文件,用于管理nginx进程。
pid        /var/run/nginx.pid;

# 事件模型与worker进程连接数设置。
events {
	#单个worker进程最大连接数,nginx最大连接数=worker连接数*worker进程数。
    worker_connections  1024;
}

# 模块设置部分,设定http服务器,利用它的反向代理功能提供负载均衡支持。
http {
# 文件扩展名与文件类型映射表。
    include       /etc/nginx/mime.types;

# 默认文件类型。
    default_type  application/octet-stream;

# 设定访问日志的日志记录格式。
    log_format  main  '$remote_addr - $remote_user [$time_local] "$request" '
                      '$status $body_bytes_sent "$http_referer" '
                      '"$http_user_agent" "$http_x_forwarded_for"';

# access_log指令指定日志文件的存放路径,后边的main表示用log_format中main的格式。
	access_log  /var/log/nginx/access.log  main;

# sendfile指令指定 nginx 是否调用sendfile 函数(zero copy方式)来输出文件,对于普通应用,必须设为on。
# 如果用来进行下载等应用磁盘IO重负载应用,可设置为off,以平衡磁盘与网络IO处理速度,降低系统uptime。
    sendfile        on;
    #tcp_nopush     on;

# 连接超时时间,单位是秒。如果上传大文件,需要将这个参数调整大。
    keepalive_timeout  65;

    #gzip  on;

# 包含站点的配置文件。
    include /etc/nginx/conf.d/*.conf;
}
站点配置
[shebnowei@bogon conf.d]$ cat default.conf

# 设定基于域名的虚拟主机部分。
server {
# 监听的端口(也可以是172.16.1.7:80形式)。
    listen       80;

# 配置访问域名。
    server_name  localhost;

    #charset koi8-r;
    #access_log  /var/log/nginx/log/host.access.log  main;

# 默认访问的location标签段。
    location / {
	# 该location的目录地址。
        root   /usr/share/nginx/html;

	# 首页排序。
        index  index.html index.htm;
    }

    #error_page  404              /404.html;

    # redirect server error pages to the static page /50x.html
    #
    error_page   500 502 503 504  /50x.html;
    location = /50x.html {
        root   /usr/share/nginx/html;
    }

    # proxy the PHP scripts to Apache listening on 127.0.0.1:80
    #
    #location ~ \.php$ {
    #    proxy_pass   http://127.0.0.1;
    #}

    # pass the PHP scripts to FastCGI server listening on 127.0.0.1:9000
    #
    #location ~ \.php$ {
    #    root           html;
    #    fastcgi_pass   127.0.0.1:9000;
    #    fastcgi_index  index.php;
    #    fastcgi_param  SCRIPT_FILENAME  /scripts$fastcgi_script_name;
    #    include        fastcgi_params;
    #}

    # deny access to .htaccess files, if Apache's document root
    # concurs with nginx's one
    #
    #location ~ /\.ht {
    #    deny  all;
    #}
}
PS:附上Nginx的官方文档
启动 Nginx control
同Apache,熟悉systemctl命令即可。
启动Nginx
systemctl start nginx.service
停止Nginx
systemctl stop nginx.service
重启Nginx
systemctl restart nginx.service
查看Nginx状态
systemctl status nginx.service
设置Nginx开机启动
systemctl enable nginx.service
取消Nginx开机启动
systemctl disable nginx.service
MariaDB 安装及配置
centos 7 中默认是使用MariaDB数据库(替代了Mysql),因此直接使用yum是无法安装Mysql的。
如果需要安装Mysql,则需要手动添加源(http://repo.mysql.com/mysql-community-release-el7-5.noarch.rpm)。
MariaDB数据库管理系统是MySQL的一个分支,主要由开源社区在维护,采用GPL授权许可。 开发这个分支的原因之一是:甲骨文公司收购了MySQL后,有将MySQL闭源的潜在风险, 因此社区采用分支的方式来避开这个风险。
因此决定安装MariaDB替代Mysql。
安装 MariaDB install
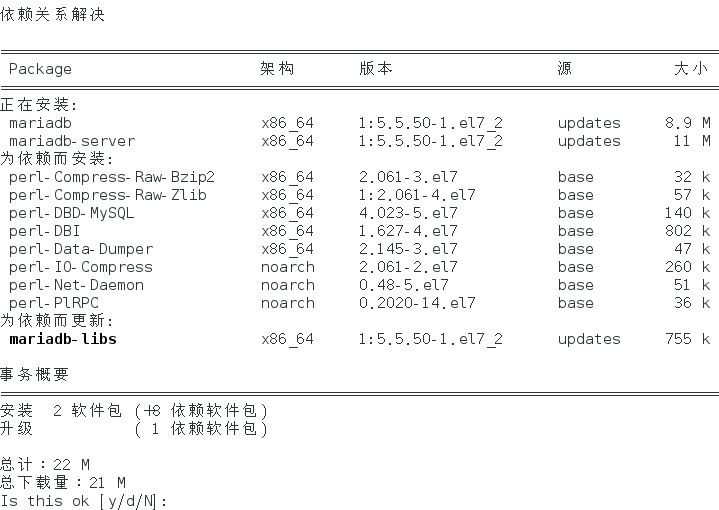
sudo yum install mariadb-server mariadb
解决依赖关系如下图:

安装完成后查看:
[shebnowei@bogon ~]$ rpm -qi mariadb
Name        : mariadb
Epoch       : 1
Version     : 5.5.50
Release     : 1.el7_2
Architecture: x86_64
Install Date: 2016年11月05日 星期六 21时37分41秒
Group       : Applications/Databases
Size        : 50864568
License     : GPLv2 with exceptions and LGPLv2 and BSD
Signature   : RSA/SHA256, 2016年08月12日 星期五 18时33分21秒, Key ID 24c6a8a7f4a80eb5
Source RPM  : mariadb-5.5.50-1.el7_2.src.rpm
Build Date  : 2016年08月12日 星期五 08时17分11秒
Build Host  : worker1.bsys.centos.org
Relocations : (not relocatable)
Packager    : CentOS BuildSystem <http://bugs.centos.org>
Vendor      : CentOS
URL         : http://mariadb.org
Summary     : A community developed branch of MySQL
Description :
MariaDB is a community developed branch of MySQL.
MariaDB is a multi-user, multi-threaded SQL database server.
It is a client/server implementation consisting of a server daemon (mysqld)
and many different client programs and libraries. The base package
contains the standard MariaDB/MySQL client programs and generic MySQL files.
配置 MariaDB config
注意 :需要在MariaDB运行的状态下运行下面的命令进行管理员密码设置。
mysql_secure_installation
然后按照一步步进行设置就好。
[shebnowei@bogon ~]$ mysql_secure_installation
/usr/bin/mysql_secure_installation:行379: find_mysql_client: 未找到命令

NOTE: RUNNING ALL PARTS OF THIS SCRIPT IS RECOMMENDED FOR ALL MariaDB
      SERVERS IN PRODUCTION USE!  PLEASE READ EACH STEP CAREFULLY!

In order to log into MariaDB to secure it, we'll need the current
password for the root user.  If you've just installed MariaDB, and
you haven't set the root password yet, the password will be blank,
so you should just press enter here.

Enter current password for root (enter for none):
OK, successfully used password, moving on...

Setting the root password ensures that nobody can log into the MariaDB
root user without the proper authorisation.

Set root password? [Y/n] y
New password:
Re-enter new password:
Password updated successfully!
Reloading privilege tables..
 ... Success!


By default, a MariaDB installation has an anonymous user, allowing anyone
to log into MariaDB without having to have a user account created for
them.  This is intended only for testing, and to make the installation
go a bit smoother.  You should remove them before moving into a
production environment.

Remove anonymous users? [Y/n] y
 ... Success!

Normally, root should only be allowed to connect from 'localhost'.  This
ensures that someone cannot guess at the root password from the network.

Disallow root login remotely? [Y/n] y
 ... Success!

By default, MariaDB comes with a database named 'test' that anyone can
access.  This is also intended only for testing, and should be removed
before moving into a production environment.

Remove test database and access to it? [Y/n] y
 - Dropping test database...
 ... Success!
 - Removing privileges on test database...
 ... Success!

Reloading the privilege tables will ensure that all changes made so far
will take effect immediately.

Reload privilege tables now? [Y/n] y
 ... Success!

Cleaning up...

All done!  If you've completed all of the above steps, your MariaDB
installation should now be secure.

Thanks for using MariaDB!
设置完成后,就可以使用mysql命令登录到数据库了。
[shebnowei@bogon ~]$ mysql -uroot -p
Enter password:
Welcome to the MariaDB monitor.  Commands end with ; or \g.
Your MariaDB connection id is 11
Server version: 5.5.50-MariaDB MariaDB Server

Copyright (c) 2000, 2016, Oracle, MariaDB Corporation Ab and others.

Type 'help;' or '\h' for help. Type '\c' to clear the current input statement.

MariaDB [(none)]> show databases;
+--------------------+
| Database           |
+--------------------+
| information_schema |
| mysql              |
| performance_schema |
+--------------------+
3 rows in set (0.00 sec)

MariaDB [(none)]>
另外,MariaDB的配置文件为:
-
/etc/my.cnf文件
-
/etc/my.cnf.d/*.cnf文件
启动 MariaDB control
启动MariaDB
systemctl start mariadb.service
停止MariaDB
systemctl stop mariadb.service
重启MariaDB
systemctl restart mariadb.service
查看MariaDB状态
systemctl status mariadb.service
设置MariaDB开机启动
systemctl enable mariadb.service
取消MariaDB开机启动
systemctl disable mariadb.service
PHP 安装及配置
安装 PHP install
PHP 安装需要安装PHP本身以及相关组件(对Mariadb的支持)。
sudo yum install php
解决依赖关系:
依赖关系解决

================================================================================
 Package           架构          版本                      源              大小
================================================================================
正在安装:
 php               x86_64        5.4.16-36.3.el7_2         updates        1.4 M
为依赖而安装:
 libzip            x86_64        0.10.1-8.el7              base            48 k
 php-cli           x86_64        5.4.16-36.3.el7_2         updates        2.7 M
 php-common        x86_64        5.4.16-36.3.el7_2         updates        563 k

事务概要
================================================================================
安装  1 软件包 (+3 依赖软件包)

总下载量:4.7 M
安装大小:17 M
Is this ok [y/d/N]:
输入y完成安装,之后安装PHP组件。
sudo yum install php-mysql php-gd libjpeg* php-ldap php-odbc php-pear php-xml php-xmlrpc php-mbstring php-bcmath php-mhash
依赖关系解决:
依赖关系解决

================================================================================
 Package                  架构       版本                     源           大小
================================================================================
正在安装:
 libjpeg-turbo-devel      x86_64     1.2.90-5.el7             base         98 k
 libjpeg-turbo-static     x86_64     1.2.90-5.el7             base        120 k
 libjpeg-turbo-utils      x86_64     1.2.90-5.el7             base         76 k
 php-bcmath               x86_64     5.4.16-36.3.el7_2        updates      56 k
 php-gd                   x86_64     5.4.16-36.3.el7_2        updates     126 k
 php-ldap                 x86_64     5.4.16-36.3.el7_2        updates      51 k
 php-mbstring             x86_64     5.4.16-36.3.el7_2        updates     504 k
 php-mysql                x86_64     5.4.16-36.3.el7_2        updates     100 k
 php-odbc                 x86_64     5.4.16-36.3.el7_2        updates      64 k
 php-pear                 noarch     1:1.9.4-21.el7           base        357 k
 php-xml                  x86_64     5.4.16-36.3.el7_2        updates     124 k
 php-xmlrpc               x86_64     5.4.16-36.3.el7_2        updates      67 k
为依赖而安装:
 php-pdo                  x86_64     5.4.16-36.3.el7_2        updates      97 k
 php-process              x86_64     5.4.16-36.3.el7_2        updates      55 k
 t1lib                    x86_64     5.1.2-14.el7             base        166 k
 unixODBC                 x86_64     2.3.1-11.el7             base        413 k

事务概要
================================================================================
安装  12 软件包 (+4 依赖软件包)

总下载量:2.4 M
安装大小:7.4 M
Is this ok [y/d/N]:
安装完成后,需要重启httpd和mariadb的服务。
安装 phpMyAdmin
sudo yum install phpmyadmin
但是却发现找不到源:
Loading mirror speeds from cached hostfile
 * base: mirrors.btte.net
 * extras: mirrors.tuna.tsinghua.edu.cn
 * updates: mirrors.tuna.tsinghua.edu.cn
没有可用软件包 phpmyadmin。
错误:无须任何处理
原因:需要安装EPEL包。
EPEL (Extra Packages for Enterprise Linux,企业版Linux的额外软件包)是Fedora小组维护的一个软件仓库项目,为RHEL/CentOS提供他们默认不提供的软件包。 这个源兼容RHEL及像CentOS和Scientific Linux这样的衍生版本。
sudo yum install epel-release
会显示安装如下的软件包:
依赖关系解决

================================================================================
 Package                架构             版本            源                大小
================================================================================
正在安装:
 epel-release           noarch           7-6             extras            14 k

事务概要
================================================================================
安装  1 软件包

总下载量:14 k
安装大小:24 k
Is this ok [y/d/N]:
安装完成后重新安装phpmyadmin:
[shebnowei@bogon etc]$ sudo yum install phpmyadmin
[sudo] password for shebnowei:
已加载插件:fastestmirror, langpacks
epel/x86_64/metalink                                     | 4.3 kB     00:00
epel                                                     | 4.3 kB     00:00
(1/3): epel/x86_64/group_gz                                | 170 kB   00:01
(2/3): epel/x86_64/updateinfo                              | 671 kB   00:01
(3/3): epel/x86_64/primary_db                              | 4.3 MB   02:30
Loading mirror speeds from cached hostfile
 * base: mirrors.btte.net
 * epel: mirrors.tuna.tsinghua.edu.cn
 * extras: mirrors.tuna.tsinghua.edu.cn
 * updates: mirrors.tuna.tsinghua.edu.cn
正在解决依赖关系
--> 正在检查事务
---> 软件包 phpMyAdmin.noarch.0.4.4.15.8-2.el7 将被 安装
--> 正在处理依赖关系 php-tcpdf-dejavu-sans-fonts,它被软件包 phpMyAdmin-4.4.15.8-2.el7.noarch 需要
--> 正在处理依赖关系 php-tcpdf,它被软件包 phpMyAdmin-4.4.15.8-2.el7.noarch 需要
--> 正在处理依赖关系 php-php-gettext,它被软件包 phpMyAdmin-4.4.15.8-2.el7.noarch 需要
--> 正在检查事务
---> 软件包 php-php-gettext.noarch.0.1.0.11-12.el7 将被 安装
---> 软件包 php-tcpdf.noarch.0.6.2.11-1.el7 将被 安装
--> 正在处理依赖关系 php-tidy,它被软件包 php-tcpdf-6.2.11-1.el7.noarch 需要
---> 软件包 php-tcpdf-dejavu-sans-fonts.noarch.0.6.2.11-1.el7 将被 安装
--> 正在检查事务
---> 软件包 php-tidy.x86_64.0.5.4.16-5.el7 将被 安装
--> 正在处理依赖关系 libtidy-0.99.so.0()(64bit),它被软件包 php-tidy-5.4.16-5.el7.x86_64 需要
--> 正在检查事务
---> 软件包 libtidy.x86_64.0.0.99.0-31.20091203.el7 将被 安装
--> 解决依赖关系完成

依赖关系解决

================================================================================
 Package                       架构     版本                       源      大小
================================================================================
正在安装:
 phpMyAdmin                    noarch   4.4.15.8-2.el7             epel   4.7 M
为依赖而安装:
 libtidy                       x86_64   0.99.0-31.20091203.el7     epel   132 k
 php-php-gettext               noarch   1.0.11-12.el7              epel    22 k
 php-tcpdf                     noarch   6.2.11-1.el7               epel   2.1 M
 php-tcpdf-dejavu-sans-fonts   noarch   6.2.11-1.el7               epel   257 k
 php-tidy                      x86_64   5.4.16-5.el7               epel    23 k

事务概要
================================================================================
安装  1 软件包 (+5 依赖软件包)

总下载量:7.2 M
安装大小:37 M
一路y后,查看安装情况:
[shebnowei@bogon etc]$ rpm -qi phpMyAdmin
Name        : phpMyAdmin
Version     : 4.4.15.8
Release     : 2.el7
Architecture: noarch
Install Date: 2016年11月05日 星期六 23时45分12秒
Group       : Applications/Internet
Size        : 25072112
License     : GPLv2+ and MIT and BSD
Signature   : RSA/SHA256, 2016年08月29日 星期一 23时33分48秒, Key ID 6a2faea2352c64e5
Source RPM  : phpMyAdmin-4.4.15.8-2.el7.src.rpm
Build Date  : 2016年08月29日 星期一 01时31分05秒
Build Host  : buildvm-06.phx2.fedoraproject.org
Relocations : (not relocatable)
Packager    : Fedora Project
Vendor      : Fedora Project
URL         : https://www.phpmyadmin.net/
Summary     : Handle the administration of MySQL over the World Wide Web
Description :
phpMyAdmin is a tool written in PHP intended to handle the administration of
MySQL over the World Wide Web. Most frequently used operations are supported
by the user interface (managing databases, tables, fields, relations, indexes,
users, permissions), while you still have the ability to directly execute any
SQL statement.

Features include an intuitive web interface, support for most MySQL features
(browse and drop databases, tables, views, fields and indexes, create, copy,
drop, rename and alter databases, tables, fields and indexes, maintenance
server, databases and tables, with proposals on server configuration, execute,
edit and bookmark any SQL-statement, even batch-queries, manage MySQL users
and privileges, manage stored procedures and triggers), import data from CSV
and SQL, export data to various formats: CSV, SQL, XML, PDF, OpenDocument Text
and Spreadsheet, Word, Excel, LATEX and others, administering multiple servers,
creating PDF graphics of your database layout, creating complex queries using
Query-by-example (QBE), searching globally in a database or a subset of it,
transforming stored data into any format using a set of predefined functions,
like displaying BLOB-data as image or download-link and much more...
重启httpd服务后,访问http://localhost/phpmyadmin即可登陆到phpMyAdmin:

配置 PHP config
PHP的配置文件为/etc/php.ini。里面每一项都有英文注释,可以参考英文注释配置。
配置 PHP with Nginx
Nginx本身不能处理PHP,当接收到请求后,如果是PHP请求,则发给PHP解释器处理,并把结果返回给客户端。 Nginx一般是把请求发FastCGI管理进程处理,FastCGI管理进程选择cgi子进程处理结果并返回被Nginx。 也可以让Nginx作反向代理服务器,将PHP请求转发给Apache服务器解析后将结果返回给客户端。
PHP-FPM是一个PHP FastCGI管理器,是只用于PHP的。 PHP-FPM其实是PHP源代码的一个补丁,旨在将FastCGI进程管理整合进PHP包中。必须将它patch到你的PHP源代码中,在编译安装PHP后才可以使用。 新版PHP已经集成PHP-FPM了,不再是第三方的包了,推荐使用。PHP-FPM提供了更好的PHP进程管理方式,可以有效控制内存和进程、可以平滑重载PHP配置,比spawn-fcgi具有更多优点,所以被PHP官方收录了。
首先安装PHP-FPM
[root@localhost conf.d]# sudo yum install php-fpm
已加载插件:fastestmirror, langpacks
base                                                     | 3.6 kB     00:00
extras                                                   | 3.4 kB     00:00
nginx                                                    | 2.9 kB     00:03
updates                                                  | 3.4 kB     00:00
Loading mirror speeds from cached hostfile
 * base: mirrors.btte.net
 * epel: mirrors.tuna.tsinghua.edu.cn
 * extras: mirrors.tuna.tsinghua.edu.cn
 * updates: mirrors.tuna.tsinghua.edu.cn
正在解决依赖关系
--> 正在检查事务
---> 软件包 php-fpm.x86_64.0.5.4.16-36.3.el7_2 将被 安装
--> 解决依赖关系完成

依赖关系解决

================================================================================
 Package         架构           版本                      源               大小
================================================================================
正在安装:
 php-fpm         x86_64         5.4.16-36.3.el7_2         updates         1.4 M

事务概要
================================================================================
安装  1 软件包

总下载量:1.4 M
安装大小:4.5 M
Is this ok [y/d/N]: y
Downloading packages:
php-fpm-5.4.16-36.3.el7_2.x86_64.rpm                       | 1.4 MB   00:00
Running transaction check
Running transaction test
Transaction test succeeded
Running transaction
  正在安装    : php-fpm-5.4.16-36.3.el7_2.x86_64                            1/1
  验证中      : php-fpm-5.4.16-36.3.el7_2.x86_64                            1/1

已安装:
  php-fpm.x86_64 0:5.4.16-36.3.el7_2

完毕!
PHP-FPM的配置文件为/etc/php-fpm.conf。
使用systemctl start php-fpm启动。
修改nginx的配置文件vim /etc/nginx/conf.d/default.conf,取消#pass the PHP scripts to FastCGI server listening on 127.0.0.1:9000下面的代码注释,并修改/scripts为$document_root:
location ~ \.php$ {
	#root           html;
	fastcgi_pass   127.0.0.1:9000;
	fastcgi_index  index.php;
	fastcgi_param  SCRIPT_FILENAME  $document_root$fastcgi_script_name;
	include        fastcgi_params;
}
之后重启Nginx服务器,即可访问php页面。
注意:如果改为$document_root$fastcgi_script_name后依然报file not found错误,应该是$document_root为空导致,需要配置root变量(注意并不能在 location / 中配置,而应该在server段下配置)
root /usr/share/nginx/html;
当然也可以把 ‘location ~ .php’ 段中的root定义下或者直接修改SCRIPT_FILENAME为:
fastcgi_param SCRIPT_FILENAME /usr/share/nginx/html/$fastcgi_script_name;
总而言之$document_root指向本段location中的root所定义值,如果未在本段定义,则为server下的root。
参考文献
CentOS-7-64bit 配置Apache + MySQL + PHP
CentOS 7.0: 安装Apache+MariaDB+PHP

